EmailGuard
  • Pricing
Log inRegister
DocumentationAPI ReferenceKnowledge Base

Documentation

Documentation

Help center guides

Getting started
  • Introduction
  • Getting started in the app
  • Sign-in and account recovery
Teams
  • Creating and switching teams
  • Team settings
  • Inviting and managing members
  • Accepting team invitations
  • Understanding roles
Account
  • Managing your account
  • Securing your account
Billing
  • Billing plans and subscription
  • Billing usage
Notifications
  • Notification rules
  • Notification channels
Security
  • Audit log
Developers
  • Creating API keys
  • Your first email detection check
  • Integrating from the dashboard

Getting started in the app

Find your way around after sign-in — team switcher, Team sidebar, and profile menus.

Loading article…

On this page

  • Layout at a glance
  • Switch teams
  • Team vs account settings
  • Where documentation lives
  • Next steps

After you sign in, EmailGuard opens on your active team. Almost every setting and API key is scoped to that team.
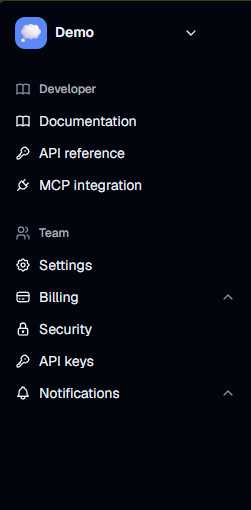
Sidebar with team switcher, Developer links, Team nav, and profile menu

Layout at a glance

AreaWhereWhat it controls
Team switcherTop of the sidebar (team name + chevron)Which team is active
DeveloperUpper sidebar groupDocumentation, API reference, MCP integration
TeamMiddle sidebar groupSettings, Members (shared teams), Billing, Security, API keys, Notifications
Profile menuBottom of the sidebar (your name)Account settings, personal security, your teams list

Billing and Notifications expand to show sub-pages (for example Billing → Usage, Notifications → Rules / Channels).

Switch teams

  1. Open the team switcher at the top of the sidebar.
  2. Select the team you want to work in.

API keys, billing, members, and notification rules always apply to the active team. See Creating and switching teams.

Team vs account settings

  • Team → Settings — team name, emoji, contact email, and (for parent teams) sync options. See Team settings.
  • Profile → Settings — your name, emoji, email, and password. See Managing your account.
  • Team → Security — team audit log (Owner/Admin). See Audit log.
  • Profile → Security — MFA, sessions, and your personal audit history. See Securing your account.

Where documentation lives

NeedGo to
Dashboard how-tosDocumentation (this help center)
Endpoint schemas & SDKsAPI reference
Signal definitions, scopes, rolesKnowledge base

You can also open these from the in-app Developer section in the sidebar.

Next steps

  • Invite teammates: Inviting and managing members
  • Issue a key: Creating API keys
  • Run a detect call: Your first email detection check